Leverage the power of Amazon SageMaker and PyTorch Lightning to build ML models avoiding to manage boilerplate code and infrastructure.

Democratizing AI for every data scientist, with modern tools
In real-world applications, managed AI services such as Amazon Rekognition and Amazon Comprehend offer a viable alternative to dedicated data science teams building models from scratch. Even when a use case requires model re-training with purpose-built datasets such as custom image labels or text entities, it can be easily achieved with Amazon Rekognition Custom Labels or Amazon Comprehend Custom Entities.
These services offer state of the art machine learning model implementations, covering several use cases. Such models are not a feasible approach in some contexts. It could happen either because the underlying network requires being deeply customized to data scientists need to implement network architectures that are above state of the art, such as LSTMs, GANs, OneShot learners, Reinforcement Learning Models, or even model ensembles.
Research and model building is a never-ending job in machine learning, opening every day a whole new set of capabilities. Nevertheless, it often requires a large team of diverse professionals to build a model from the Neural Network architecture definition to production deployment.
Amazon SageMaker comes into the play aiming to democratize machine learning for everyone, with a set of tools targeting both data scientists and software engineers.
Amazon SageMaker (SM) is a suite of tools dedicated to dataset labelization (SM GroundTruth), model development (SM Notebooks), distributed training, and inference deployment (SM Models/Endpoints) and experiment creation, debugging and monitoring (SageMaker Studio).
In just a few years, many deep learning frameworks appeared, starting with TensorFlow, Apache MXNet, and PyTorch, each of them raising the bar of model creation and customization. One of the most promising technology, due to its flexibility in dynamic computational graph definition and data parallelism support.
With Lightning, PyTorch gets both simplified AND on steroids.
Amazon SageMaker introduced support for PyTorch since day one and built a consistent user base during the last few years. Nevertheless, PyTorch missed the simplicity, low learning curve, and high level of abstraction of alternatives such as Keras (for Tensorflow). A few frameworks were developed to fill the gap, such as the excellent Fast.ai library, which aims to be an easy-to-learn solution to developers approaching PyTorch.
In 2019, to bring machine learning efforts to a common denominator, William Falcon published the first production-ready version of PyTorch Lightning, a framework to structure a PyTorch project, gain support for less boilerplate and improved code reading.
In this article, we will start from scratch with a simple neural network creation following a consolidated workflow to develop, test, and deploy a machine learning model on Amazon SageMaker, with a step-by-step tutorial, focused on a beginner audience.
No prior knowledge of Amazon SageMaker nor PyTorch is required, even if it could help to understand some language APIs.
MNIST is the new "Hello World."
We will start from scratch with a simple neural network used for handwritten digit recognition, using the famous MNIST dataset. The use case is pretty narrow, but in recent years it has become the "Hello World" of image processing with a neural network, due to the simplicity of the resulting model.
Amazon SageMaker Notebooks
The first step when dealing with a machine learning project is building the model in some experiment context. Amazon SageMaker Notebooks offer easy setup of a JupyterLab environment. PyTorch offers a prepared dataset through the torchvision library. Since this article wants to present a workflow suitable for general-purpose model training, we decided not to use the PyTorch dataset and download MNIST images from the internet and save them into an S3 bucket.
When using SageMaker Studio to build the model, we suggest downloading a bunch of data locally to speed up development and testing. We can easily do that using the following command:
mkdir -p $DATA_PATH/training
mkdir -p $DATA_PATH/testing
aws s3 cp $S3_DATA_BUCKET/mnist.tar.gz $DATA_PATH/
cd $DATA_PATH && tar xvf mnist.tar.gz && rm -f mnist.tar.gz
Now we can display a few random data, just to better understand how it is organized before we start building our Lightning model.
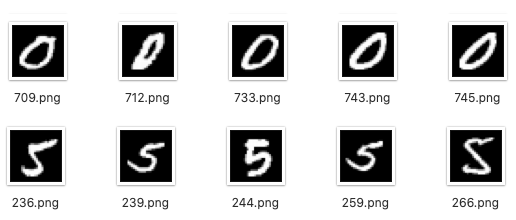
A small set of MNIST dataset of handwritten digits images.
MNIST Classifier and Amazon SageMaker
Amazon SageMaker manages code runs from Python code after we set up a PyTorch estimate. An estimator is a class that holds all the required params needed by training (or an inference script to run on a SageMaker container).
# MNIST on SageMaker with PyTorch Lightning
import json
import boto3
import sagemaker
from sagemaker.pytorch import PyTorch

# Initializes SageMaker session which holds context data
sagemaker_session = sagemaker.Session()

# The bucket containig our input data
bucket = 's3://dataset.mnist'

# The IAM Role which SageMaker will impersonate to run the estimator
# Remember you cannot use sagemaker.get_execution_role()
# if you're not in a SageMaker notebook, an EC2 or a Lambda
# (i.e. running from your local PC)

role = 'arn:aws:iam::XXXXXXXX:role/SageMakerRole_MNIST'

# Create a new PyTorch Estimator with params
estimator = PyTorch(
  # name of the runnable script containing __main__ function (entrypoint)
  entry_point='train.py',
  # path of the folder containing training code. It could also contain a
  # requirements.txt file with all the dependencies that needs
  # to be installed before running
  source_dir='code',
  role=role,
  framework_version='1.4.0',
  train_instance_count=1,
  train_instance_type='ml.p2.xlarge',
  # these hyperparameters are passed to the main script as arguments and
  # can be overridden when fine tuning the algorithm
  hyperparameters={
  'epochs': 6,
  'batch-size': 128,
  })

# Call fit method on estimator, wich trains our model, passing training
# and testing datasets as environment variables. Data is copied from S3
# before initializing the container
estimator.fit({
    'train': bucket+'/training',
    'test': bucket+'/testing'
})
In order to perform training of a Neural Network with convolutional layers, we have to run our training job on an ml.p2.xlarge instance with a GPU.
Amazon Sagemaker defaults training code into a code folder within our project, but its path can be overridden when instancing Estimator. Training scripts is where the magic of PyTorch Lightning happens.
import argparse
import os

# default pytorch import
import torch

# import lightning library
import pytorch_lightning as pl

# import trainer class, which orchestrates our model training
from pytorch_lightning import Trainer

# import our model class, to be trained
from MNISTClassifier import MNISTClassifier

# This is the main method, to be run when train.py is invoked
if __name__ =='__main__':

    parser = argparse.ArgumentParser()

    # hyperparameters sent by the client are passed as command-line arguments to the script.
    parser.add_argument('--epochs', type=int, default=50)
    parser.add_argument('--batch-size', type=int, default=64)
    parser.add_argument('--gpus', type=int, default=1) # used to support multi-GPU or CPU training

    # Data, model, and output directories. Passed by sagemaker with default to os env variables
    parser.add_argument('-o','--output-data-dir', type=str, default=os.environ['SM_OUTPUT_DATA_DIR'])
    parser.add_argument('-m','--model-dir', type=str, default=os.environ['SM_MODEL_DIR'])
    parser.add_argument('-tr','--train', type=str, default=os.environ['SM_CHANNEL_TRAIN'])
    parser.add_argument('-te','--test', type=str, default=os.environ['SM_CHANNEL_TEST'])

    args, _ = parser.parse_known_args()
    print(args)

    # Now we have all parameters and hyperparameters available and we need to match them with sagemaker
    # structure. default_root_dir is set to out_put_data_dir to retrieve from training instances all the
    # checkpoint and intermediary data produced by lightning
    mnistTrainer=pl.Trainer(gpus=args.gpus, max_epochs=args.epochs, default_root_dir=args.output_data_dir)

    # Set up our classifier class, passing params to the constructor
    model = MNISTClassifier(
        batch_size=args.batch_size,
        train_data_dir=args.train,
        test_data_dir=args.test
        )

    # Runs model training
    mnistTrainer.fit(model)

    # After model has been trained, save its state into model_dir which is then copied to back S3
    with open(os.path.join(args.model_dir, 'model.pth'), 'wb') as f:
        torch.save(model.state_dict(), f)
Our trainer can run with no changes either on our local GPU rig or on an Amazon SageMaker container.
The magic of Amazon SageMaker is within environment variables which default to trainer and model params. Within a container, these variables are set to folders that are copied from S3 before running our script and back to S3 after training is completed.
At this point, we haven't defined a model yet, just mapped some variables and configured an estimator object, but some Lightning specific constructs are already visible, such as Trainer class.
Trainer, as its name suggests, is a Python class capable of abstracting all training workflow steps, plus a series of everyday operations such as saving model checkpoints after every epoch. Trainer automates a set of activities such as finding the best learning rate, ensure reproducibility, set the number of GPUs and multi-node backend for parallel training, and many more.
Lightning offers a set of defaults to make training super simple. Values can be overridden since it has full control over the complete lifecycle because our classifier class must conform to a protocol.
Let's break down our code in and check what happens at each step
1. Import libraries and extend LightningModule
import os

import math

import random as rn

import numpy as np


import torch

import torch.nn as nn

from torch.nn import functional as F

from torch.utils.data import DataLoader

from torch.utils.data.sampler import SubsetRandomSampler

from torchvision import transforms as T, datasets

import pytorch_lightning as pl


class MNISTClassifier(pl.LightningModule):
Every PyTorch Lightning implementation must extend the base pl.LightningModule class which inherits from nn.Module adding some utility methods.
2. Prepare network layers
def __init__(self, train_data_dir,batch_size=128,test_data_dir=None, num_workers=4):
        '''Constructor method
        Parameters:
        train_data_dir (string): path of training dataset to be used either for training and validation
        batch_size (int): number of images per batch. Defaults to 128.
        test_data_dir (string): path of testing dataset to be used after training. Optional.
        num_workers (int): number of processes used by data loader. Defaults to 4.
        '''

        # Invoke constructor
        super(MNISTClassifier, self).__init__()

        # Set up class attributes
        self.batch_size = batch_size
        self.train_data_dir = train_data_dir
        self.test_data_dir = test_data_dir
        self.num_workers = num_workers

        # Define network layers as class attributes to be used
        self.conv_layer_1 = torch.nn.Sequential(
        # The first block is made of a convolutional layer (3 channels, 28x28 images and a kernel mask of 5),
        torch.nn.Conv2d(3,28, kernel_size=5),
        # a non linear activation function
        torch.nn.ReLU(),
        # a maximization layer, with mask of size 2
        torch.nn.MaxPool2d(kernel_size=2))

        # A second block is equal to the first, except for input size which is different
        self.conv_layer_2 = torch.nn.Sequential(
        torch.nn.Conv2d(28,10, kernel_size=2),
        torch.nn.ReLU(),
        torch.nn.MaxPool2d(kernel_size=2))

        # A dropout layer, useful to reduce network overfitting
        self.dropout1=torch.nn.Dropout(0.25)

        # A fully connected layer to reduce dimensionality
        self.fully_connected_1=torch.nn.Linear(250,18)

        # Another fine tuning dropout layer to make network fine tune
        self.dropout2=torch.nn.Dropout(0.08)

        # The final fully connected layer wich output maps to the number of desired classes
        self.fully_connected_2=torch.nn.Linear(18,10)
In the class constructor, we prepare network layers to be used later building the computational graph. Convolutional layers extract features from images and pass to the following layers adding nonlinearity and randomness.
3. Build data loaders for train, validation and test datasets
    def load_split_train_test(self, valid_size = .2):
        '''Loads data and builds training/validation dataset with provided split size

        Parameters:
        valid_size (float): the percentage of data reserved to validation
        Returns:
        (torch.utils.data.DataLoader): Training data loader
        (torch.utils.data.DataLoader): Validation data loader
        (torch.utils.data.DataLoader): Test data loader

        '''

        num_workers = self.num_workers

        # Create transforms for data augmentation. Since we don't care wheter numbers are upside-down, we add a horizontal flip,
        # then normalized data to PyTorch defaults
        train_transforms = T.Compose([T.RandomHorizontalFlip(),
                                           T.ToTensor(),
                                           T.Normalize([0.485, 0.456, 0.406],[0.229, 0.224, 0.225])])
        # Use ImageFolder to load data from main folder. Images are contained in subfolders wich name represents their label. I.e.
        # training
        #   |--> 0
        #   |    |--> image023.png
        #   |    |--> image024.png
        #   |    ...
        #   |--> 1
        #   |    |--> image032.png
        #   |    |--> image0433.png
        #   |    ...
        #   ...
        train_data = datasets.ImageFolder(self.train_data_dir, transform=train_transforms)

        # loads image indexes within dataset, then computes split and shuffles images to add randomness
        num_train = len(train_data)
        indices = list(range(num_train))
        split = int(np.floor(valid_size * num_train))
        np.random.shuffle(indices)

        # extracts indexes for train and validation, then builds a random sampler
        train_idx, val_idx = indices[split:], indices[:split]
        train_sampler = SubsetRandomSampler(train_idx)
        val_sampler = SubsetRandomSampler(val_idx)
        # which is passed to data loader to perform image sampling when loading data
        train_loader = torch.utils.data.DataLoader(train_data, sampler=train_sampler, batch_size=self.batch_size, num_workers=num_workers)
        val_loader = torch.utils.data.DataLoader(train_data, sampler=val_sampler, batch_size=self.batch_size, num_workers=num_workers)

        # if testing dataset is defined, we build its data loader as well
        test_loader = None
        if self.test_data_dir is not None:
            test_transforms = T.Compose([T.ToTensor(),T.Normalize([0.485, 0.456, 0.406],[0.229, 0.224, 0.225])])
            test_data = datasets.ImageFolder(self.test_data_dir, transform=test_transforms)
            test_loader = torch.utils.data.DataLoader(train_data,batch_size=self.batch_size, num_workers=num_workers)
        return train_loader, val_loader, test_loader
DataLoader classes are crafted from the PyTorch image loader. Shuffling and splitting ensure a random validation dataset, built from training images.
4. Implement utility methods required by Trainer
    def prepare_data(self):
        '''Prepares datasets. Called once per training execution
        '''
        self.train_loader, self.val_loader, self.test_loader  = self.load_split_train_test()

    def train_dataloader(self):
        '''
        Returns:
        (torch.utils.data.DataLoader): Training set data loader
        '''
        return self.train_loader

    def val_dataloader(self):
        '''
        Returns:
        (torch.utils.data.DataLoader): Validation set data loader
        '''
        return self.val_loader

    def test_dataloader(self):
        '''
        Returns:
        (torch.utils.data.DataLoader): Testing set data loader
        '''
        return DataLoader(MNIST(os.getcwd(), train=False, download=False, transform=transform.ToTensor()), batch_size=128)
PyTorch Lightning enforces a standard project structure, requiring the classifier to implement certain methods that will be invoked by Trainer class when performing training and validation.
5. Implement forward pass
    def forward(self,x):
        '''Forward pass, it is equal to PyTorch forward method. Here network computational graph is built
        Parameters:
        x (Tensor): A Tensor containing the input batch of the network
        Returns:
        An one dimensional Tensor with probability array for each input image
        '''
        x=self.conv_layer_1(x)
        x=self.conv_layer_2(x)
        x=self.dropout1(x)
        x=torch.relu(self.fully_connected_1(x.view(x.size(0),-1)))
        x=F.leaky_relu(self.dropout2(x))
        return F.softmax(self.fully_connected_2(x), dim=1)

    def configure_optimizers(self):
        '''
        Returns:
        (Optimizer): Adam optimizer tuned wit model parameters
        '''
        return torch.optim.Adam(self.parameters())
The forward method is equal to the traditional PyTorch forward function that must be implemented to build the computational graph.
6. Implement the training step
    def training_step(self, batch, batch_idx):
        '''Called for every training step, uses NLL Loss to compute training loss, then logs and sends back
        logs parameter to Trainer to perform backpropagation
        '''

        # Get input and output from batch
        x, labels = batch

        # Compute prediction through the network
        prediction = self.forward(x)

        loss = F.nll_loss(prediction, labels)

        # Logs training loss
        logs={'train_loss':loss}

        output = {
            # This is required in training to be used by backpropagation
            'loss':loss,
            # This is optional for logging pourposes
            'log':logs
        }

        return output
The training step method is invoked for each image batch by Trainer, computing network predictions, and their relative loss function.
7. Validation computing and stacking
    def validation_step(self, batch, batch_idx):
        ''' Prforms model validation computing cross entropy for predictions and labels
        '''
        x, labels = batch
        prediction = self.forward(x)
        return {
            'val_loss': F.cross_entropy(prediction, labels)
        }

    def validation_epoch_end(self, outputs):
        '''Called after every epoch, stacks validation loss
        '''
        val_loss_mean = torch.stack([x['val_loss'] for x in outputs]).mean()
        return {'val_loss': val_loss_mean}


    def validation_end(self, outputs):
        '''Called after validation completes. Stacks all testing loss and computes average.
        '''
        avg_loss = torch.stack([x['val_loss'] for x in outputs]).mean()
        print('Average training loss: '+str(avg_loss.item()))
        logs = {'val_loss':avg_loss}
        return {
            'avg_val_loss':avg_loss,
            'log':logs
        }
Lightning offers support to a set of optional methods such as validation_step, validation_epoch_end, and validation_end to allow developers to define how a validation loss should be computed and stack results to find the improvements during training. These methods require code returning data conforming to a specific schema, then PL outputs all the metrics in a TensorBoard compatible format.
Equivalent methods can be implemented to support model testing which is highly encouraged before going to production.
Now we're ready to give our model spin and start training with Amazon SageMaker.
Model training on Amazon SageMaker
Training starts running main.py from the command line or another Jupyter Notebook. It could also be run from AWS Lambda function, invoked by an AWS Step Function to make the training process fully scriptable and serverless. However, logs are collected into the console and pushed to Amazon CloudWatch for further inspection. This feature is pretty useful when starting multiple training jobs to fine-tune hyperparameters.
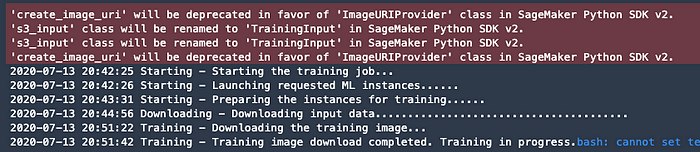
Console output for Amazon SageMaker training job.
Amazon SageMaker starts p2.xlarge instances on our behalf, then downloads input data into the container and starts our code, launching main.py, after installing all dependencies in our requirements.txt file.

Console output for Amazon SageMaker training job.
Amazon SageMaker builds a job descriptor in JSON format and passes it to the training context. In this object, all the parameters are sent to the training job as well as input directories are mapped to /opt/ml/ subfolders, receiving data from S3, and the output gets collected in a result bucket. The training code is packaged as well on a different S3 path, then downloaded into the container.
Finally, just before launching our training script, environment variables are set to standard SageMaker values.
After a couple of minutes, since we're training for just six epochs, our validation is displayed, and saved models are uploaded to S3. Since PyTorch Lightning automatically saves model checkpoints on our behalf, and we mapped its output directory to output_data_dir, we can collect from S3 also intermediary checkpoints and validation data ready to be processed and analyzed by TensorBoard.
A Classification model is available on S3 to be used in an inference script, in an Amazon SageMaker endpoint, or to be deployed on edge devices using the JIT compiler.
Where to go from here?
In this article, we've discussed how Amazon SageMaker and PyTorch Lightning work together democratizing Deep Learning, reducing the boilerplate every developer or data scientist has to write to build a model from scratch to production. Amazon SageMaker relieves the burden of spinning up and configuring training machines with just a few lines of code. At the same time, Lightning makes steps such as gradients management, optimization, and backpropagation transparent, allowing researchers to focus on the neural network architecture.
The full code of the project is available on GitHub. It can be run as a standalone script on any PC, just launching
pip install pipenv
pipenv install
pipenv shell
python main.py
If you prefer a Jupyter Notebook interface, the same code could be run within Amazon SageMaker, just running notebook/sagemaker_deploy.ipynb. Since SageMaker launches training jobs, there is no need to have a GPU instance to run the notebook.
This article is just a sample project to showcase how SageMaker and Lightning can work together. Still, it can be used as a starting point for Computer Vision tasks such as image classification, just changing the network architecture to resemble VGG or ResNet, and providing an adequate dataset.
 By
By